
Once the soil has been prepared, you can begin selecting species and planting trees for your site. There are several options for this:
- Do online research to see which trees, bushes, and wildflowers are hardy in your area.
- Visit a locally owned greenhouse or nursery to see which ones may do well for you. Big box stores are something we recommend avoiding when it comes to fruit trees and berry bushes. They generally sell the same varieties nation wide (which means they may not work in your area) and their quality often suffers. Find a local nursery and build a relationship with one that you respect their growing methods (hopefully organic).
- Get a permaculture consultation to help you determine what your site can handle. These can be done in person OR virtually.
There are many things to consider when putting fruit trees and berry bushes in the ground. Unfortunately, it’s not as easy as merely deciding what you like to eat and planting it. If you live in Michigan, no matter how much you like avocados, they just won’t survive without a heated greenhouse. Likewise, if you live in Florida, the traditional Haas avocado that you buy in the grocery store hates the humidity. So, there are other varieties that will do better in that region. Learning what does best in your area is an important step and also a lifelong journey. Enjoy that learning process.
Here are some important things to keep in mind when selecting species and planting your new food forest
- Understand the cold hardiness zone for where you live. More important than the higher temps, it’s critical to know your minimum temps. Freezing is generally more likely to harm a sensitive plant than higher temperatures. If you want to learn more about your growing zone, click here.
- Know your sun exposure. If your yard is mostly shade, you are unlikely to do well planting tree species that prefer full sun. Though a mis-planted tree may “survive”, it may not do well or produce fruit. Keep in mind that there is full sun and full shade in every USDA growing zone, so regardless of where you live – there is something that will grow and thrive on your site. Choose well and work in harmony with your site.
- Plant during the right season. Depending on where you live, the ideal time for planting fruit trees may GREATLY vary. Don’t assume that just because a nursery tells you to plant it that it is the ideal time to do so. Remember, their job is to get you the plant – it’s your job to steward it well.
- Understand the differences in varieties. Within each type of tree (peach, pear, mango, etc.) there are hundreds and even thousands of different varieties to choose from. A peach is simply NOT a peach. For example, those peaching grown in Georgia are bred for that specific growing zone and will not produce fruit in Central Florida. However, varieties of peaches like Tropic Beauty (our staff favorite), Tropic Snow, and Florida prince are bred to require less “chill hours”, so they will bare fruit much better in zone 9 and 10. Likewise, avocados have a WIDE range in their varieties. Some (like “Fantastic” or “Joey”) are cold hardy down to 15 degrees. Some avocados are better for slicing and dicing (like Winter Mexican or Wurtz), while other avocados are more ideal for guacamole (like Brogdon, Oro Negro, or Mexicola). The benefit of having someone to consult with is that you are more likely to get a variety that meets your preferences in flavor, but also one that will THRIVE on your particular site.
- Think in layers. Don’t just plant one height of trees all over the property. Think about creating production at various heights and levels. What can you grow as a root crop? A smaller perennial? A bush layer? A dwarf tree? Top story tree? Vine? By choosing to plant multiple layers in your system, you not only maximize your space, but create a scenario where various plants can work in synergy with one another. One might provide the needed shade for another. Or, better yet, one might actually fix atmospheric nitrogen into the soil to fertilize another plant.
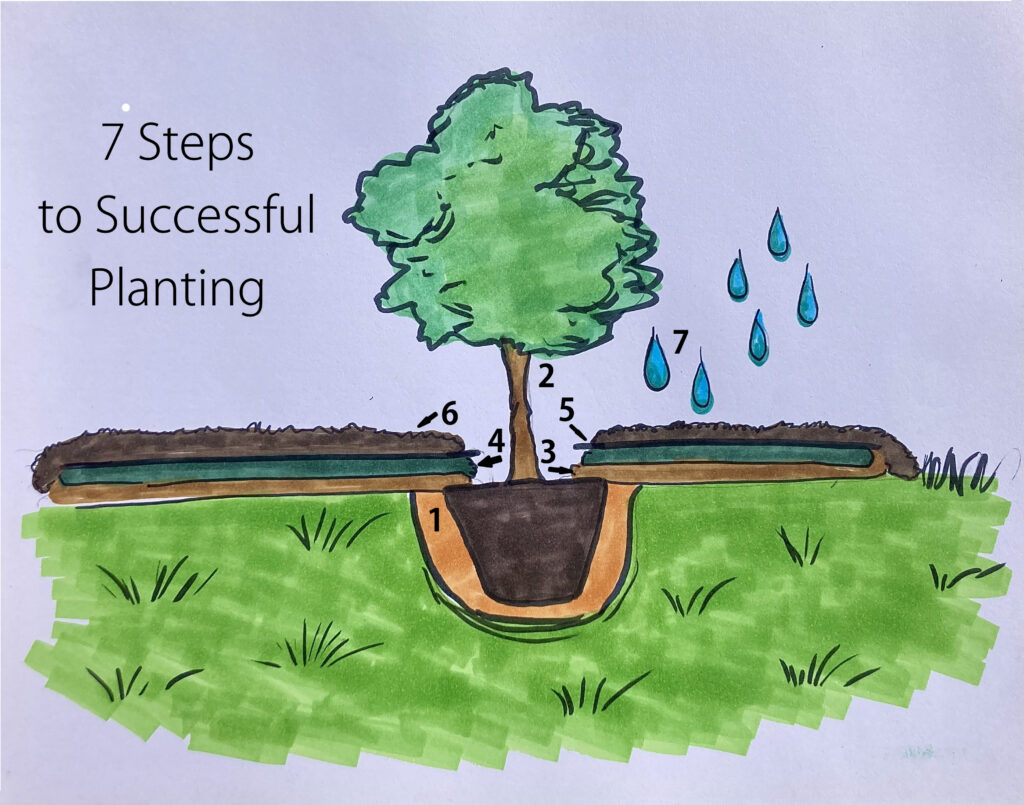
Now, it’s time to get planting
- Plant away! Use something to suppress weeds. Apply compost. Layer up 4-6″ of wood chip mulch. For more in-depth planting instructions, CLICK HERE.
- Finish a smaller area before moving on to the next. This is one of the most common mistakes that new food foresters make… they want to just put the tree in the ground and walk away. However, one of the worst things you can do for your new tree is leave it to fight with the grass around the base. Cover the soil properly, using the method above and completely finish one area before moving on. This will not only give your tree its best chance at thriving, but it will also give you a sense of completion.
- Know when to water. There is no possible way to simply say, “water your plants three times a week.” Differences in heat, sun exposure, wind, and humidity all vary so much that it’s impossible to set a specific watering schedule. So, to know when to water, put your finger in the soil down to your big knuckle. If you feel moisture, do NOT water. Plants actually need to dry out between watering. This not only causes their roots to expand and grow deeper into the soil, but also helps prevent root rot.
- Maintain your food forest and garden by checking back on the blog for our free monthly To-Do Lists. We will help remind you when to fertilize, when to plant the next crops, and when to prune.
So, now that you’ve read the theories and have done some research – it’s time to get outside and plant. Remember, you can always find more help, information, and inspiration on our social media account.
See you in the Garden!