


In cold climate regions, January is a time of deep rest. After the holidays end, it’s like our body exhales and realizes that the deep of winter has finally arrived. Instead of dreading it – lean into it. Enjoy it. It’s the perfect time to curl up with a warm blanket, read a new permaculture book, look through seed catalogues, and start planning the garden for next year in sketch books. Not to mention, it’s a great time to review the January Garden To-Do List. However, if you are in USDA Zones 9-11, we have a separate (specific) list for you. CLICK HERE for the warm climate to-do list.
It’s a great time to watch a few permaculture documentaries, catch up on our Patreon classes (if you are a subscriber), take an online course, or even look into local permaculture events in your area. For many of us in cooler climates, the winter can get a little depressing if we just hide away in our caves. So, be sure to get out and connect in your local community and spend nice days outside enjoying the changing of the seasons.
But when the slightly warmer days pop up, be sure to get out into the garden, because there are definitely things that can be done in the food forest and garden in the deep of winter.
January Garden To-Do List for USDA Zones 3-8
In the Garden & Greenhouse
- Continue to cover the soil with organic matter. You can use chopped up leaves (i.e. picked up with the lawn mower), straw, compost, etc. Better yet, use layers of each!
- Continue to plant garlic and spring bulbs. CLICK HERE for a list of what you can plant between snows.
- Take soil samples on warmer days and have them tested at your local extension office. Personally, I don’t use their “fertilizer” recommendations (because it’s rarely organic), so instead I see what nutrients are lower and improve in those areas. Honestly, in 99% of cases the regenerative answer is almost always COMPOST and more organic matter. By adding compost, you automatically improve NPK and build soil structure.
- Check seeds that are cold stratifying outside or in the refrigerator (chestnut, paw paw, acorns, etc.)
- Apply winter soil probiotic and microbial spray to compost piles (I use a product called BioAg, which is produced in Kansas City, MO). I always have this on hand to spray on the soil or trees / shrubs during warmer spells in the winter months. I shoot for every other month, because it will prevent many of the pests and diseases that can come in warmer months. Be proactive!
- Sort through your seed inventory and reorganize when possible.
- Look through seed catalogues for what you want to plant this year. Use heirloom seeds when possible, because these have not been modified or hybridized since before WW1. Often, heirloom varieties produce a healthier fruit and have much better flavor. One of my favorite websites is rareseeds.com for veggies and an Etsy Store called Seed the Stars for some tropical edibles that can be grown as annuals in cold climates..
In the Food Forest
- Wait to prune until the end of January or early February. Let the trees rest for now. Most fruit trees should be pruned during a cold / dry period. The colder temps make the sap stop flowing, and the dry weather helps prevent immediate fungal or bacterial infections. When you prune, take no more than 1/4 of the tree off in a given year, and NEVER apply a wood sealer. Let the tree heal on its own.
- Watch for rabbit or pest damage and protect trees accordingly.
- Check for deer damage (eating branches, buck rubs, etc.) weekly. Save some deer bones from hunting season to make bone sauce for deer repellant (recipe coming soon). Pack the snow around the base of tree trunks to pack down vole and rodent tunnels.
- Order organic orchard supplies for the coming season – be sure to look for holiday sales! Include seaweed extract, BioAg, neem oil, Basic H (for all foliar applications), and fish emulsion.
- Finish any winter mulching (wait for compost until spring, so you don’t add too much nitrogen now).
- Water compost piles during dry periods.
In the Shed
- Check mouse traps frequently. Add cotton balls with peppermint oil to deter rodents.
- Repair garden tools. Sand down wooden handles and reseal them (I like a good Danish oil or non-yellowing varnish).
- Sharpen all tools (pruners, cutters, shovels, etc.)
- Look for online sales for any equipment that need to be replaced.
In the Chicken Coop

- Feed extra protein (meal worms, black oiled sunflower seeds, bugs, etc.) to help them during their recovery season.
- Do NOT use supplemental lighting to increase egg production. Chickens need this off season to let their bodies rest. Let them have a natural rhythm of rest too.
- Add a small amount of corn or millet to their diet to help with caloric intake in the winter months. This helps keep them warm naturally. NEVER use heat lamps in a coop or run.
- Purchase suet blocks (>5% protein) as you see them on sale. The fat content helps birds stay warm for the winter. (click here for more tips on keeping birds warm)
- Rotate straw and bedding in the coop to keep things clean and sanitary.
- Keep water unthawed
- Use an electric water heater (OR)
- Use two watering containers and bring them in at night / rotate them
- Note: The salt water bottle in the container does NOT work outside of 1-2 degrees below freezing and only for a short time. This can work as an addition, but should not be your primary means of keeping water unthawed.
- Feed spent pumpkin and squash (from fall decor) to chickens. It helps boost their immune systems and can be a preventative for worms. NOTE: Pumpkin seeds are NOT a proven treatment for worms, but a great as part of your preventative maintenance regime. You may need to break them open for the birds to get at the inner meat of the pumpkins.
- Give healthy protein / omega 3 treats: One cheep way to do this is to go to a local pet store and get feeder fish (cheep minnows). Put them into a shallow tray (with a bit of water) and watch the birds catch them! You can also purchase live crickets from pet stores and feel them fresh veggies for a day or two. Feed several per day to your birds for a healthy winter treat.
January Garden To-Do List for USDA Zones 3-8 Continued…
Around the House & Perennial Beds
- Continue to plant spring bulbs every time the soil thaws. This can be done all winter. Click here for some of our favorite bulbs to plant in the winter.
- Pay attention to windows and address any drafts immediately. Older winters should have plastic over them (purchased at a local hardware store), which will help save $$ on heat bills. Pull blinds to keep heat inside at night and open them during the day to let natural light inside.
- Water house plants carefully.
- Only water them when you can put your finger in the soil and it feels dry up to your first knuckle (about 1″ deep). If the soil feels or looks damp – do NOT water.
- Water in the sink until water runs out of the bottom, so you know the full root ball is saturated. Let it drain for a few minutes before returning to a sunny spot near a window.
- Rotate plants every view days for even light distribution.
- Mid-Winter Banana Fertilizer for Houseplants: Soak 3 banana peels in a large jar of water for 3 days (make sure they stay submerged). Remove the banana peels and add 1 cup of the mineral rich banana water to one gallon of water. Use this ONCE this month to give your house plants a mid-winter boost.
Winter Ideas for Kids
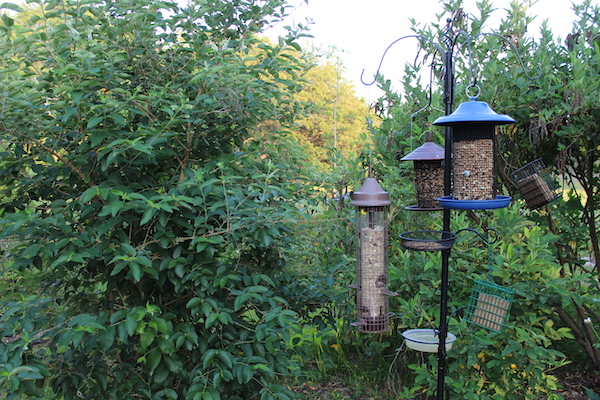
- Bird feeding is the perfect kids activity this month! My favorite bird-nerd store is Wild Birds Unlimited (WBU), which is found nationwide. They are not only knowledgeable, but often give free feeders to schools and libraries. Not to mention, the quality of their feed is far superior to box stores.
- Customize your feeds with different seeds for different birds. Each feed needs a different style feeder, but you can learn more about this by taking your kiddos to WBU.
- Nyger and Sunflower Chips: For finches, vireos, and smaller birds
- Safflower: Great to keep squirrels away, but cardinals and bluejays love this seed (especially in a hopper feeder)
- Shelled Peanuts: For bluejays and woodpeckers
- Black-oiled Sunflower Seeds: Everyone loves these! A must have for the feeder. Woodpeckers, sparrows, nuthatches, titmouse, etc.
- White Millet: Indigo or painted buntings
- Suet: Woodpeckers (ladder back, downy, hairy, red headed, etc.)
Time to Plan
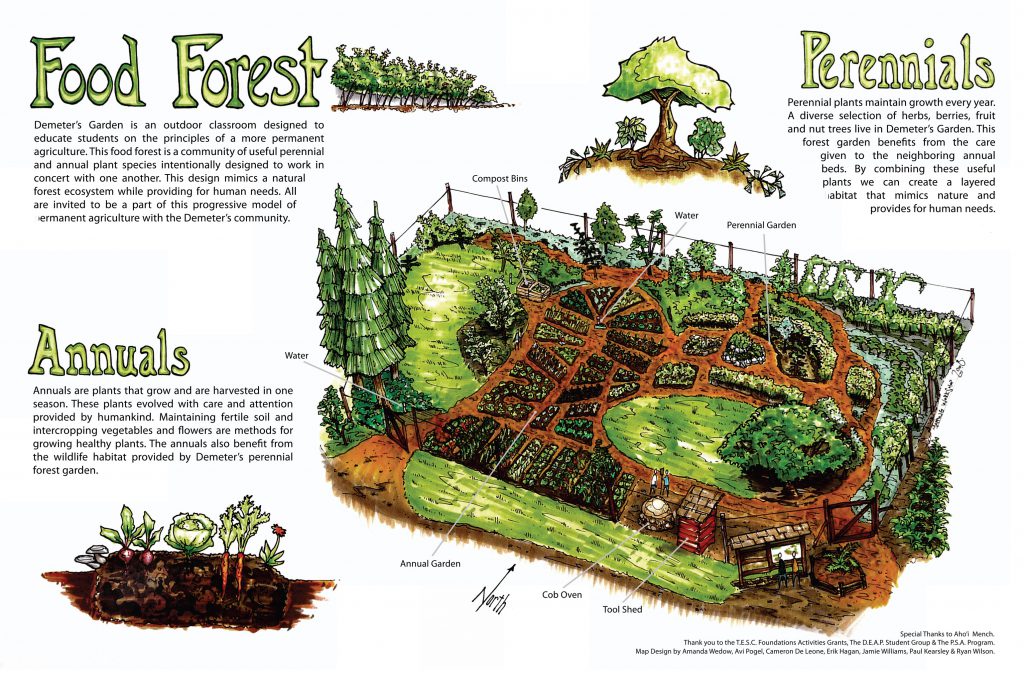
During these winter months while the fruit trees and gardens are dormant, it’s the perfect time to plan for the spring. If you are interested in a personalized permaculture consultation for your property, we do both in-person visits to your site AND virtual consultations (for those out of our geographical area). CLICK HERE to learn more.

What’s included with your Patreon Membership
- On-going permaculture / property mentorship
- 1st Week of the Month LIVE Q&A
- 2nd Week of the Month Practical Permaculture PDF
- 3rd Week of the Month Permaculture Class
- 4th Week of the Month Farm Interview & Spotlight
- Ad-free videos
- Behind-the-scenes content
- Digital downloads
- Exclusive content
- Earlybird ticket pricing for in-person events
- Early access to all events
- Live event VIP
- Live Q&As
- Livestreams
- Video tutorials & lessons
- Private community
- Exclusive voting power
- Quarterly Online Classes – EXCLUSIVE
- Monthly Practical Permaculture PDF
NOTE: Membership offerings vary depending on the level of patron support.


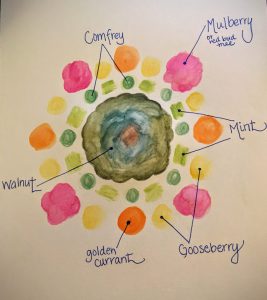 Once you have created a few different drawings of your layout, I would recommend sitting on it for a few days and then coming back to it later. Run the ideas by a friend and get their feedback. When I was initially planning my layout, I incorporated too many alkaline loving plants next to my blue berries, which do best with slightly acidic soils. I was so focused on the fruit and berries that I liked, and the way they would look together, that I missed a pretty big piece of the puzzle. The result would have been an environment where likely neither would have thrived, so I was relieved to have the insight from another permaculture eye.